One of the most popular questions we get here at the Catamount Trail Association is: What type of equipment do I need? You’d think this would be an easy question to answer.
What kind of equipment? Backcountry ski equipment!
If only it were that simple…
The world of backcountry skiing can be a confusing one. This is because the phrase backcountry skiing can encompass many different types of activities. Cross country downhill (XCD) skis, skinny classic cross-country (XC) skis, alpine touring (AT), telemark, and splitboard equipment all fall under the backcountry umbrella.
Below we will cover recommended gear for the Catamount Trail, and for our backcountry zones. At the end we have included a list of additional items all backcountry users should consider having with them.
Learn about some gear recommendations for skiing the Catamount Trail from CTA Trail Chief, Board Member, and Tour Leader, Bob Brandt, in this short film by Climb High Productions.
Recommended Ski Equipment for the Catamount Trail
In this section we will make some general equipment recommendations that would be appropriate for use on the Catamount Trail (CT), or other rolling backcountry ski trails where where downhill turns aren’t the primary objective.
Let’s further tighten up our constraints and pretend that we are shopping for someone who plans on skiing the CT from end-to-end. If attempting all 31 sections of the Catamount Trail you will encounter some areas that are pretty mellow and some are pretty challenging. The recommendations below take all of this into consideration.

Skis
We recommend medium-sized (about 68mm wide underfoot), metal-edged skis with a waxless base. These skis are often referred to as XCD (cross country downhill) skis. Examples of this type of ski are the Madshus Panorama M68 and the Fischer S-bound 98. You can go slightly wider or slightly narrower than the skis mentioned above, but as long as the skis have a metal edge and a waxless base you should be ok.
Narrower skis with less shape will tour better, be faster on the flats, and easier to haul up the climbs. However, these skis typically sacrifice some flotation and stability on the typically ungroomed Catamount Trail and downhill performance. Wider skis are more work going uphill, but typically have more shape and are easier to control when headed downhill.
The skis recommended above fall in the middle of the pack and provide a good mixture of touring and downhill performance perfect for tackling the variety of conditions and terrain found on the Catamount Trail.
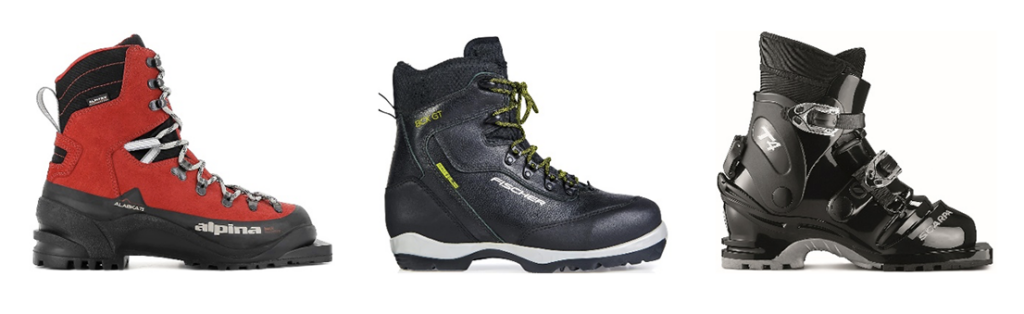
Boots
We recommend a lightweight 75mm or NNN XCD boots. Examples include the Alpina Alaska, the Fischer BCX Grand Tour and the Scarpa T4. Some boots are offered as 75mm or NNN, like the Alpina Alaska, while others are either 75mm (the Scarpa T4) or NNN (the Fischer BCX Grand Tour).
See more on 75mm and NNN bindings below.
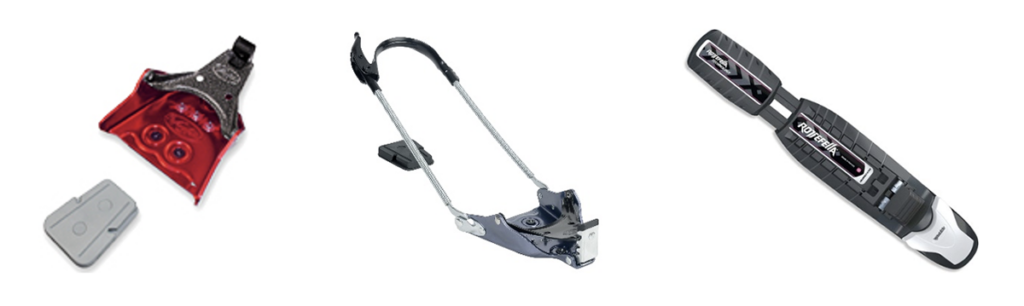
Bindings
We recommend either 3-pin 75mm or NNN BC bindings. 3-pin 75mm bindings are generally regarded as providing more control than NNN systems, but both types are used extensively on the Catamount Trail.
For 3-pin 75mm boots we recommend the Voile Mountaineer or the Voile 3 Pin Cable bindings. The Voile 3 Pin Cable binding can be used with or without cable. So, if you crash and tear the pins out of your boot you can continue just using the cable. Or… if you break a cable you can hopefully still use the 3-pin toe piece to get out of the woods. This redundant retention system makes these bindings great for any backcountry outing.
For NNN bindings we recommended a backcountry or BC rated binding.
Rottefella has introduced the Xplore BC binding and some boot makers are making compatible boots. We have less experience with the system, however, it does appear to be well suited to the Catamount Trail.
Regardless of which system you choose, be sure it is compatible with your boots and always be sure to carefully inspect the condition of your bindings before a tour to reduce the potential for having a failure while out on the trail.
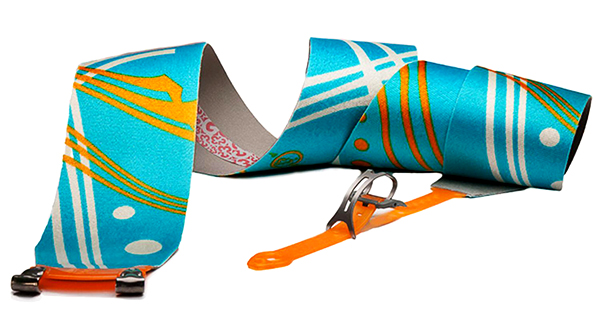
Climbing Skins
We would definitely recommend climbing skins for certain sections of the Catamount Trail. Climbing skins go on the bottoms of your skis to provide additional traction. There are sections of the Catamount Trail with a significant amount of climbing and having climbing skins available for the steeper and more sustained aspects will help you move more quickly and efficiently by reducing the need to sidestep or herringbone. That said, climbing skins are not necessary for every section and if you are just starting out this is not something you will need right away.
Kicker Skins
Kicker skins are partial length skins that attach under the ski and run from just in front of the binding to slightly behind the boot. They are about as long as the waxless pattern on most no-wax skis. They do not provide nearly as much purchase on the way up, but they do offer more grip than most waxless patterns while maintaining some glide. Kicker skins are great for rolling terrain if willing to give up some grip in an effort to keep things light. Again this is another piece of equipment that isn’t necessary, but may be considered.
Recommended Equipment For Managed BC Zones
This section is for everyone interested in exploring our managed backcountry zones. These areas were developed primarily as downhill zones with a designated uphill route and a variety of downhill options. This section will be pretty brief as we’re not here to tell you one brand is better than another… just make some general recommendations so that you don’t show up with the wrong gear.
AT Skis or Tele Skis with Touring Bindings and Boots / Splitboard Equipment
At our managed zones, because making downhill turns is the name of the game any splitboard, telemark, or AT setup is going to be the way to go. Modern backcountry equipment is pretty incredible and there are a myriad of options out there. If you’re looking for a new setup we recommend visiting your local shop and working with them to identify the best setup to meet your needs.
Skins
No matter how you’re traveling, you’re going to need skins. Skins go on the bottom of your skis and provide grip so you can ascend a snowy slope. There are a lot of options out there, but we prefer skins that combine a mix of mohair and nylon fibers. These tend to offer the best combinations of grip, glide, durability, and price.
Gear That’s Not Recommended
We don’t recommend nordic or XCD gear at our managed zones. The typical ski setup you’d use on the Catamount Trail is not appropriate for use at our managed backcountry zones. We’re sure there are people out there that can shred on lightweight gear. However, in general you’ll have more fun and enjoy a lower risk of equipment failure and injury on heavier, downhill oriented equipment.
Additional Items (Everyone)
Other items necessary for a day in the woods depend on the difficulty and length of the tour. Below is a list of all items you should consider bringing with you on a backcountry tour:
- Skis
- Ski poles with baskets (adjustable poles recommended)
- Boots
- Climbing skins
- Goggles and/or sunglasses
- Backpack
- Wax for waxable skis or Maxi-glide for no-wax skis
- Plenty of liquid to drink throughout the day
- Lunch and extra snacks
- Extra layers of clothing to put on at breaks or in an emergency, extra socks
- Mitts, gloves, hat, thin gloves for skinning
- Balaclava/buff
- Scraper to remove ice buildup on skis/skins
- Gaiters
- Map/Compass and WhistleDuct tape
- Moleskin
- Small first aid kit, Moleskin
- Space blanket
- Headlamp & extra batteries
- Chemical hand & toe warmers
- Small pad to sit or stand on for lunch
- Toilet paper (Be sure to pack it out!)
- Sunscreen / Lip Balm
- Personal identification and medical insurance card (if you have one)
- Any medications you might need
- Repair Kit
Please keep in mind that these are just guidelines. Hopefully this will help get you started. We want to you have fun and that means not suffering too much on the flat and uphill sections, and having enough control on the descents to avoid injury. Please take every equipment recommendation with a grain of salt, ask questions, talk to as many people as possible, and build your own opinions. Only you can decide what’s right for you.
See you on the trail!
")